 |
Radical Pie Equation Editor |
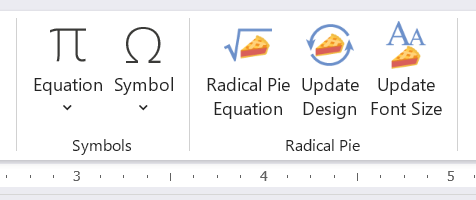
If you have Microsoft Word on your computer, then the Radical Pie installer adds three icons to the right end of the Insert tab in the Microsoft Word ribbon interface, as shown below.

Use the Radical Pie Equation button (shown to the right) to insert a new equation in the current document at the cursor location. When you do this, a new Radical Pie window will open with a blank equation, and the base font size will be initialized to the font size used by the surrounding text in the Word document.
After you’ve made some edits, you can save your equation inside Radical Pie by typing Ctrl+S or choosing Save from the File menu. Whenever an equation is saved, its contents are automatically updated inside the Word document. When you are finished writing an equation, the Radical Pie window can be closed by typing Ctrl+W, choosing Close from the File menu, or clicking the close box in the upper-right corner. It’s typical to enter an equation in Radical Pie and then type Ctrl+S followed by Ctrl+W to save it and return to the Word document.
(The Equation button shown to the left of the Radical Pie icons inserts a legacy equation using Word’s built-in Office Math equation editor. This is not part of Radical Pie.)
To edit an equation that already exists in a Word document, simply double-click on it to open a Radical Pie window containing the equation. After edits have been made, save the equation and close the window using Ctrl+S followed by Ctrl+W as you would with a new equation.
If you make edits to an equation and attempt to close the Radical Pie window without saving, you will be asked whether you want to save it. Choosing Don’t Save will discard any edits you’ve made, and the equation will not be updated in the Word document.
It is convenient to assign a keyboard shortcut to the Radical Pie Equation button so you don’t have to navigate to the Insert tab and click the icon every time you want to insert a new equation. To do this, follow these steps:
Once this has been done, typing your shortcut will immediately insert a blank equation in your document and open Radical Pie for editing.

It’s possible that you will decide to change the design used by your equations after you have added a bunch of them to a Word document. Instead of opening each equation individually to update its design, you can use the Update Design button (shown to the right) to automatically update the design for all the equations in the current selection. This function iterates through all of the equations in the current selection and applies the current user default design to each one. This default design is the same one that currently applies when a new equation is created.
For large documents containing many equations, this operation can take some time, possibly minutes for something the size of a book. Once Radical Pie has finished its updates, it can still take a few moments for Word to apply all of the changes. You can usually tell that Word is still processing because the mouse pointer is rapidly changing.

When you insert a new equation into a Word document, it automatically applies the font size used by the surrounding text. If you later change the font size in your Word document, then the font size used by the equations will no longer match. Instead of opening each equation individually to update its font size, you can use the Update Font Size button (shown to the right) to automatically update the font size for all the equations in the current selection. This function iterates through all of the equations in the current selection and sets the base font size for each one to the the size used by the text containing it.
The note under Updating Equation Designs about the operation taking a long time for large documents also applies to updating the font size.
If you have a Word document containing legacy Office Math equations, then it’s possible to convert them to Radical Pie. For inline equations, place the cursor immediately after the equation object, making sure it’s outside so that the frame around the equation is not showing. Then insert a new Radical Pie equation, and it will be initialized to the same mathematical expression in the Office Math equation. For displayed equations, place the cursor at the beginning of the following line before inserting a new equation.
Almost all equations have parts that extend below the baseline, at least a little bit. When Radical Pie saves an equation in a Word document, what you see is a generic picture that Word doesn’t really know anything about, other than the fact that it was made with Radical Pie. Word aligns the bottom edge of a picture with the baseline of the surrounding text by default, but this would make most equations appear as if they were raised up. In order to align the picture so that the baseline in the equation matches the baseline of the text, Radical Pie must lower the picture by the appropriate amount by modifying the font position. This means that if you place the cursor immediately after an equation in your document and start typing, the text will be lowered just as much as the equation. Any text that is accidentally typed here can be returned to normal by selecting it, opening the Font window (by clicking the widget in the lower-right corner of the Font section of the Home tab), switching the the Advanced tab, and selecting Normal for the Position property under Character Spacing.
In order to avoid the problem of lowered text while entering equations, Radical Pie automatically inserts a space after each newly created equation object. This space does not get lowered with the equation, and the cursor is placed after it, so continuing the type after a new equation has been saved should produce text on the normal baseline. Radical Pie does not insert a space if a space or punctuation character already exists immediately after the location where a new equation is being inserted. In this case, or in cases where text is being added after an existing equation, just be sure to leave at least one character between the end of the equation and the location where new text is entered. Pressing Backspace to delete characters until the cursor reaches the end of an equation will not result in lowered text, so it’s possible to make edits without the baseline changing as long as you’re careful to start at least one character away. This is useful when punctuation needs to appear after an equation. Just press Backspace after entering a new equation to remove the automatically-inserted space, and then type the punctation character.
Unfortunately, Word’s line breaking algorithm doesn’t necessarily keep an equation object and any punctuation following it together. As a result, you will sometimes see an equation at the end of one line, and the comma or period following it at the beginning of the next line. There are two common ways to work around this problem. First, you can include the punctuation in the equation itself so it becomes part of the picture. In this case, you would no longer add a punctuation character after the equation object, and thus there’s nothing that can be split up. The second option is to insert a No-Width Non Break character between the equation object and the punctuation. This character can be added by clicking the Symbol button under the Insert tab, selecting More Symbols..., and switching the the Special Characters tab in the dialog that appears. The result is that a character with Unicode value U+200D is inserted into the text (and it’s called a zero width joiner). If you can remember this number, then you may find it easier to use a feature of Word that allows hexadecimal entry for Unicode characters. At the location where you want to insert the No-Width Non Break character, type “200D” (without quotes) followed by Alt+X. The Unicode value will then be replaced by the character to which it corresponds.
Displayed equations are equations shown on their own line instead of inline with the text. They are usually centered or indented from the left, and it’s often the case that some or all of the displayed equations in a document are numbered on the right. Displayed equations are best handled in Word by using a paragraph style to define spacing, justification, and tab positions that are automatically applied when that style is selected.
To create a new style for displayed equations in Word, follow these steps:
A paragraph style named Equation should now appear in the list of styles. Select this style on a new line where a displayed equation will appear, and press Tab to move the cursor to the center. Then open Radical Pie to insert an equation, and it will be nicely centered when you save it. If you’re not numbering, then press Enter to start a new line in the Normal paragraph style.
If you are numbering, then press Tab when the cursor is on the right side of the equation. This will move the cursor to the right end of the line where you can enter an equation number. To implement an automatically incremented counter, use a SEQ field code. To enter a field code, type Ctrl+F9, and you will see a pair of braces. Inside the braces, type the letters SEQ followed by a space, followed by a name you want to give your counter, such as equation. Then press F9 without the Control key to activate the field code and replace it with the value of the counter.
To number equations in the (x.y) format, where x is a chapter or section number, and y is the equation number, you can use two counters. To insert a chapter number, type Ctrl+F9 to create a field, enter SEQ chapter \c, and type F9 to activate it. The \c switch prevents the counter from being incremented, so you get the same chapter number each time you use it. You’ll need to establish the chapter number beforehand by using the field code SEQ chapter without the \c switch in a title or heading. Otherwise, you’ll get zero when you try to use the counter without incrementing.
To call out a reference to a numbered equation (or anything else) in a Word document, first create a bookmark for the item to be referenced. A bookmark is created by selecting the text that will be called out and clicking the Bookmark button in the Links section under the Insert tab in the ribbon. In the dialog that appears, enter whatever name you’d like for the bookmark and hit Okay. In the case of an equation number, select the entire number, including a chapter or section number if present, and then create a bookmark for it.
Once a bookmark has been created for an equation number, it can be called out by using a REF field code. Place the cursor where the callout should appear in the text, and type Ctrl+F9 to create a new field code. Type REF followed by a space, followed by the name you gave the bookmark you’re calling out. Finally, press F9 without the Control key to activate the field code, and the contents of the referenced bookmark should appear.
Radical Pie can automatically set the alternative text for each equation embedded in a Word document to its corresponding TEX code. To enable this, check the Generate alternative text box in the Editor Configuration dialog. Once it’s enabled, to add alternative to existing equations that didn’t previously have it, you can simply open and save the equation without doing anything else. Alternative text can be generated for all the equations in the selection by clicking either the Update Design or Update Font Size buttons.
The Aptos font, which is currently the default font in Microsoft Word, isn’t actually installed on your computer like an ordinary font. Instead, it’s cached as a “cloud font” and stored in a special location, and this makes it difficult for other applications to use it. To use the Aptos font with Radical Pie, download the TrueType files from the following location and install them. After unzipping the downloaded package, select all the font files you want to install, right-click on one of them, and choose Install from the popup menu.
https://www.microsoft.com/en-us/download/details.aspx?id=106087